

Building an API means designing a clear, secure way for software to request and exchange data, then implementing, testing, documenting, and deploying it. You can write the code yourself or use a no-code platform that generates the API from your existing data sources. Either way, the process follows the same eight steps: define the purpose, choose a style, design the endpoints, model the data, build, secure, test, and document and deploy.
This guide walks through each step with examples, shows the code and no-code options side by side, and finishes with a sample use case that exposes inventory data to a Power BI dashboard, including a short video walkthrough.
What is an API?
API stands for application programming interface. An API is an intermediary that lets software components talk to each other in a standard way. A common analogy is a restaurant waiter: you don't walk into the kitchen. You tell the waiter what you want, and the waiter brings it back. The API does the same for software, taking a request, retrieving what is needed, and returning a response, while hiding the complexity behind the scenes. For a short refresher on the term, see what API stands for.
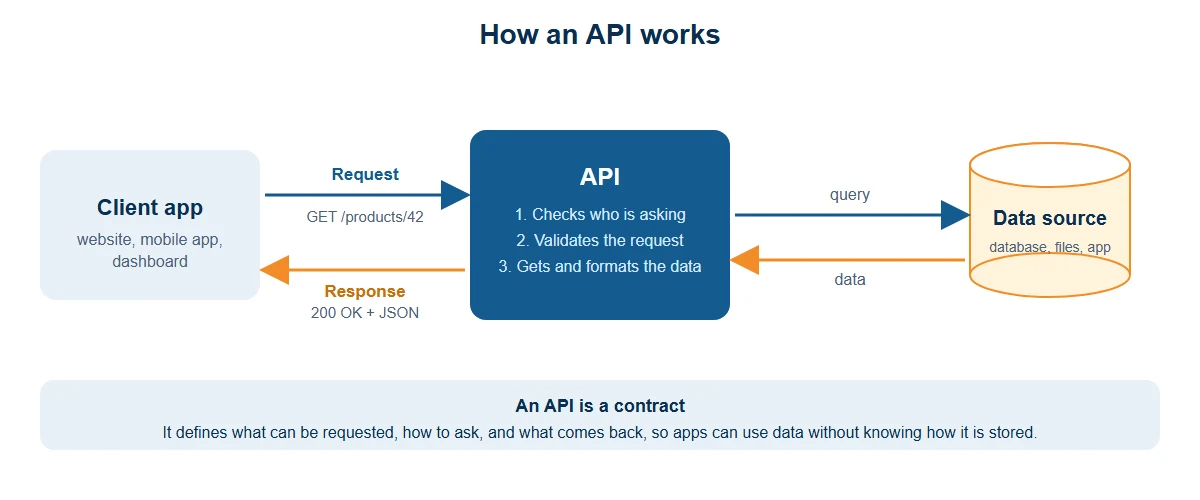
APIs make data and functions reusable. A mobile app, a website, and a reporting dashboard can all draw from the same API, which keeps information consistent and speeds up development.
Types of APIs
Before you build, it helps to know the main styles. A web API (HTTP API) is the broad term for APIs used over the internet. The most common styles are below.
Style | How it works | Strengths | Best for |
|---|---|---|---|
REST | Uses HTTP methods (GET, POST, PUT, DELETE) on resources | Simple, scalable, widely supported | Web and mobile apps; most data-access use cases |
SOAP | Exchanges XML messages under a strict, formal contract | Built-in standards for security and reliability | Enterprise and legacy systems |
GraphQL | Lets clients request exactly the fields they need in one query | Flexible queries, fewer round trips | Complex data and varied clients |
REST is a strong default for most projects. For more detail, see our guides to types of APIs, web API vs. REST API, and the REST API definition.
Before you build: plan your API
A few minutes of planning saves hours later.
Define the objective. Decide what problem the API solves and who will use it. For example, an e-commerce team might want an API that lets a mobile app check product availability and place orders.
Plan the functionality. Break the goal into small, manageable pieces. A weather data API, for instance, might need separate endpoints for current conditions, forecasts, and historical data.
Know your consumers. Will the API be used by your own developers, by partners, or by tools such as dashboards? Their needs shape the design, the security, and the documentation.
Identify your data. List the databases, files, or applications the API will read from or write to, and decide what should and should not be exposed.
How to build an API in eight steps
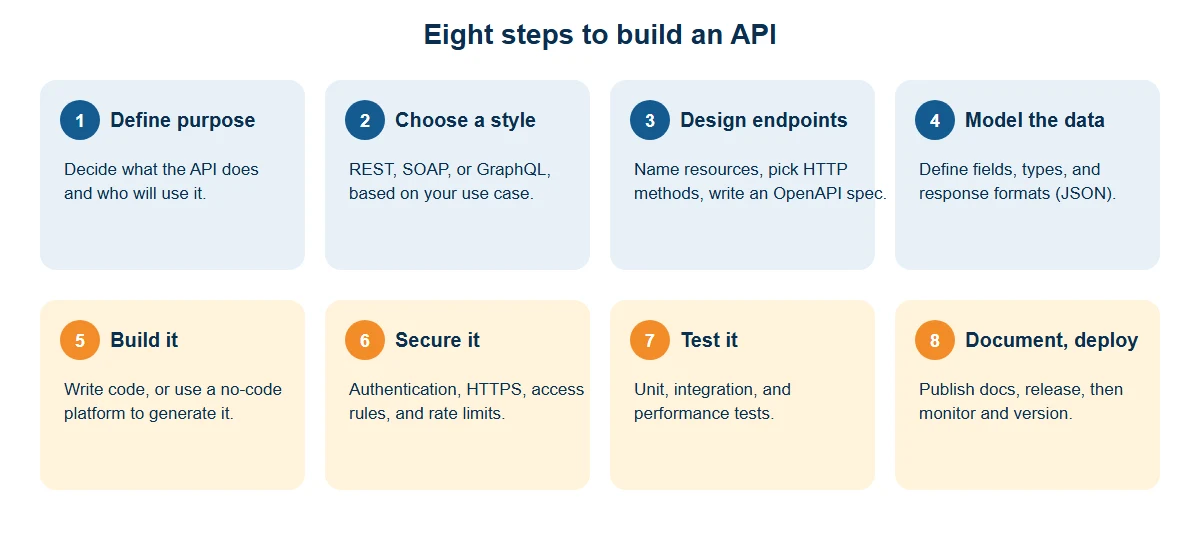
Step 1: Define the purpose and users
Write one or two sentences describing what the API does and who it serves. Keep the scope small at first. You can always add endpoints later.
Step 2: Choose an API style
Pick REST, SOAP, or GraphQL based on your use case (see the table above). REST is widely adopted but not the only approach, so match the style to your clients and data.
Step 3: Design the endpoints
Endpoints are the addresses clients call. Name them after resources (nouns), and use HTTP methods to express actions.
Action | Method and path | What it does | Typical success code |
|---|---|---|---|
List products | | Returns a list of products | 200 OK |
Get one product | | Returns a single product | 200 OK |
Create an order | | Creates a new order | 201 Created |
Update an order | | Replaces or updates an order | 200 OK |
Delete an order | | Removes an order | 204 No Content |
Write the design down in a specification such as OpenAPI before you build. A spec gives the team a shared plan and can generate documentation automatically. For more on this step, read our guide to API design best practices and learn about API-first design.
Step 4: Model the data
Decide which fields each resource has, what type each field is, and how responses are formatted (JSON is the most common format). Think about whether to keep data normalized (stored once and referenced) or denormalized (copied for faster reads), and choose data types that protect integrity and performance. Here is an example response for GET /products/42:
{
 "id": 42,
 "name": "Desk lamp",
 "price": 34.99,
 "stock": 120
}
Step 5: Build it
You have three main paths:
Approach | What it involves | Best for |
|---|---|---|
Custom code | Write the API in a language and framework you know (for example Python, JavaScript, Java, or C#) | Teams that need full control and have developer time |
API framework or generator | Use a framework, or tools that generate an API layer from a database schema | Faster builds with developers still involved |
No-code platform | Design the API visually and publish it directly from your data sources | Business and data teams, and projects that need to ship quickly |
Here is a minimal custom-code example in Python with Flask. It is for illustration; a production API also needs the security, validation, and tests described below.
from flask import Flask, jsonify

app = Flask(__name__)

products = [{"id": 42, "name": "Desk lamp", "price": 34.99, "stock": 120}]

@app.get("/products")
def list_products():
 return jsonify(products)

@app.get("/products/<int:product_id>")
def get_product(product_id):
 for product in products:
 if product["id"] == product_id:
 return jsonify(product)
 return jsonify({"error": "Product not found"}), 404

if __name__ == "__main__":
 app.run(port=5000)
Step 6: Secure It
Security belongs in the design from the start.
Authentication
confirms who is calling. Common options are API keys, OAuth 2.0, and JSON Web Tokens (JWT). OAuth 2.0 and JWT are widely used industry standards.
Authorization
decides what each caller may do. Role-based access control keeps permissions simple to manage.
HTTPS
encrypts traffic between client and API.
Rate limiting
protects the service from overload and misuse.
Input validation
checks every request before it reaches your data.
Step 7: Test it
Test the normal paths and the unusual ones. A solid test plan includes:
Unit tests
for individual functions.
Integration tests
that check the API with its data source.
Performance tests
to see how it behaves under load.
Error-case tests
such as missing fields, wrong IDs, and unauthorized calls.
Tools like Postman or Swagger make it easy to send requests and inspect responses. For a deeper look, see our guide to API testing.
Step 8: Document, deploy, and monitor
Document
every endpoint, parameter, and example response. Good documentation is how other teams adopt your API.
Deploy
to a stable environment, in the cloud or on-premises, and keep a separate test environment.
Monitor
traffic, errors, and response times, and keep logs for troubleshooting.
Version
the API so you can improve it without breaking existing users, for example,
/v1/products
API design best practices
Use clear, consistent names for endpoints and fields.
Follow REST conventions for methods and status codes.
Keep request and response payloads lean.
Return meaningful, standardized error messages.
Add pagination for large lists.
Version your API from day one.
Document as you build.
For the full list, see our guides to API design best practices and API development best practices.
Build APIs without code with Astera API Management
Writing and maintaining API code takes time, and many teams would rather spend that time on the data and the business problem. Astera lets you publish your APIs and integrations in a code-free environment, using a point-and-click interface on top of its ETL engine and REST API support. It covers the full lifecycle:
Develop and validate API flows.
Design requests and responses visually, and check them as you build.
Deploy and test.
Verify flows before deployment, and generate OpenAPI (Swagger) documentation automatically.
Manage and secure access.
Control who can use each API with token-based access control and role-based restrictions.
Monitor and debug.
Use detailed logging and a live dashboard to track API consumption and server performance.
Other capabilities for publishing APIs include:
One-click database APIs,
so you can expose data from a database without writing endpoints by hand.
Asynchronous API endpoints and pagination support,
which help with large or long-running requests.
Data transformation and built-in data verification,
with tracing logs for troubleshooting.
Flexible deployment
on-premises, in the cloud, or in a hybrid setup.
See how to publish your APIs with Astera for the full list, and the Astera API Management data sheet for details on data sources, the developer portal, rate limiting, and version management. The same capabilities are part of the broader Astera Centerprise AI platform.
Combine multiple APIs with an API mashup
Sometimes the API you need doesn't come from a single source. An API mashup combines data from several APIs and presents it as one. A retailer, for example, might merge product data from its own database with shipping rates from a carrier's API and expose a single endpoint to its mobile app.
Astera supports API mashups with no coding. With Astera, you can:
Rapidly ingest third-party APIs with an API consumption component, using built-in connectors and a REST API browser.
Set up the API flow from request to response.
Apply built-in transformations, sorting, and filtering to the combined data.
Generate OpenAPI (Swagger) documentation automatically.
Secure the result with role-based access control and tokenization.
Track consumption on a live dashboard.
Sample use case: inventory data for a Power BI dashboard
Consider a hypothetical retailer with stock levels in a database. The operations team wants a Power BI dashboard that shows current inventory, and wants to avoid writing API code.
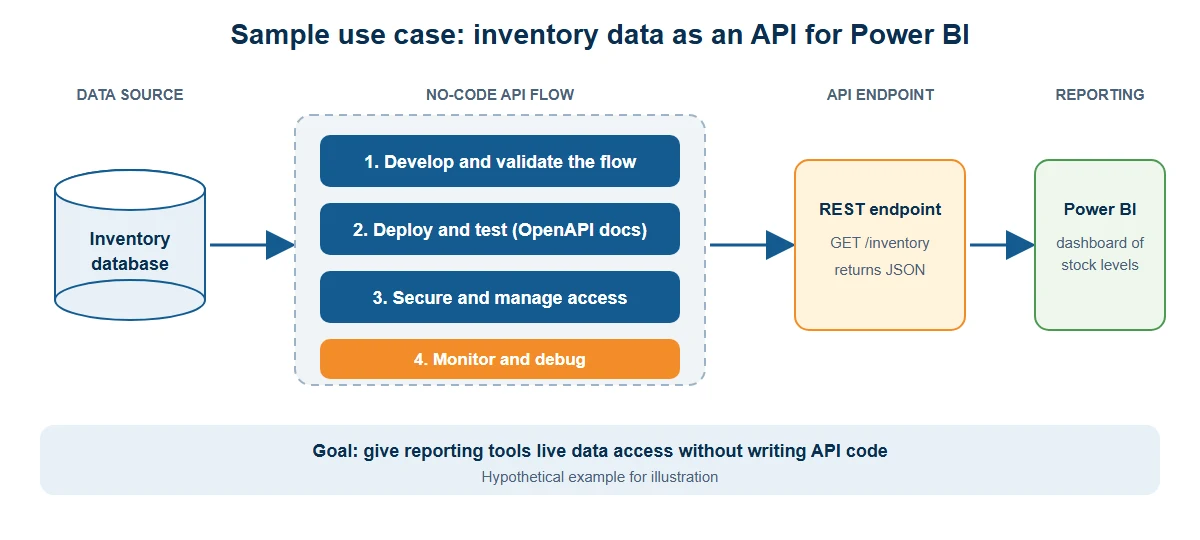
Step | What the team does | Astera API Management capability |
|---|---|---|
Connect | Point the API at the inventory database | Create APIs from databases and other data sources |
Design | Define a
endpoint with optional filters, such as location | Visual, drag-and-drop API flow with request and response configuration |
Test | Run sample requests and check results | Deploy and test, with automatic verification before deployment |
Document | Share the endpoint details with the reporting team | Generated OpenAPI documentation |
Secure | Give the reporting team access, and no one else | Role-based access control and token authentication |
Monitor | Watch usage and troubleshoot issues | Logging and a monitoring dashboard |
Report | Power BI reads the endpoint and refreshes the dashboard | Standard REST endpoint that reporting tools can consume |
Watch: design an API flow and connect it to Power BI
This short video (about 3 minutes) shows how to design an API without writing code and use it to visualize data in Power BI with Astera. It covers:
Configuring the API request
Integrating the data source
Setting up the API client
Deploying the API
Connecting Power BI to the deployed API
Connecting the API to Power BI. Power BI Desktop can typically read from a web API using its web data connection. The JSON response is converted into a table in Power Query, where you can shape the data before building visuals. You add the authentication details the API requires, such as a token, in the connection settings, and you schedule refreshes in the Power BI service. Check Microsoft's documentation for the current steps.
The result: the reporting team gets live data access through a standard, documented endpoint, and the data team keeps control over who can see what.
Common challenges and how to approach them
Unclear scope.
Start with one or two endpoints that solve a real need, then grow.
Security added late.
Build authentication, authorization, and rate limits into the first version.
Inconsistent naming.
Agree on conventions up front and use a specification to keep them.
Breaking changes.
Version the API so existing users stay unaffected as you improve it.
Limited visibility.
Add logging and monitoring from the start so issues are easy to find.
Developer bandwidth.
Consider a no-code platform for data-access APIs so developers can focus on custom logic.
Next steps
Pick one data source and one consumer, design a small API, and build it with the approach that fits your team. Test it, secure it, document it, and then expand. To explore more of the topic, see our guides to API management tools, REST API tools, API integration tools, and how to use APIs for data retrieval. If you work with a specific database, see how to create an API for MySQL, SQL Server, or PostgreSQL.
Want to build APIs without code? Start a free trial, book a consultation, or learn more about how to publish your APIs and build API mashups with Astera.