

Establishing a data warehousing system that meets all your business intelligence targets is by no means an easy task. It traditionally involves profiling source systems, designing a dimensional model by hand, writing the DDL to deploy it, building the load pipelines, and scheduling them to run, work that can take weeks. Astera's manual, step-by-step approach to this is covered in Building a Data Warehouse – A Step by Step Approach.
In this article, we'll examine a use case that describes how the Astera AI Agent builds a complete data warehouse for you from a plain-language business requirement, and how you can then connect to that warehouse in Astera Studio to analyze your data simply by asking questions. To build the warehouse, you start by describing what you want, either in a sentence or by attaching a requirements document. The agent discovers your sources, designs a star schema, deploys it, builds the load mappings, and composes the load workflows. It works through the build one phase at a time, pausing for your confirmation at each design decision, so you stay in control without doing the manual work yourself.
The journey has two parts. First, the AI Agent builds and deploys the warehouse. Second, Astera Studio turns that warehouse into a self-service analytics surface where natural-language questions become SQL, tables, and charts.
Use Case
Deskhive is a fictitious online retailer of workspace furniture and electronics, selling standing desks, ergonomic chairs, monitors, keyboards, and audio gear. Over the years it has grown into five independent operational systems, each running on its own SQL Server database, and it has now decided to bring that data together into a single warehouse to improve reporting and answer one central business question:
"How much profit are we making on each product we sell, and which customers, stores, and sales reps drive that profit?"
Deskhive's data is spread across the following five source systems:
S.No | Source database | Holds | Key tables |
|---|---|---|---|
1 | CRM_DB | Customers and their interactions | Customer, Interaction, Region |
2 | SALES_DB | Modern order-management (main system) | Product, SalesRep, SalesOrder, OrderLine |
3 | INVENTORY_DB | Stock, suppliers, warehouses (holds product cost) | Item, Supplier, Warehouse, StockLevel |
4 | HR_DB | Staff, stores, departments | Employee, Store, Department |
5 | SALES_LEGACY_DB | A retired order system kept for history (one flat table) | legacy_orders |
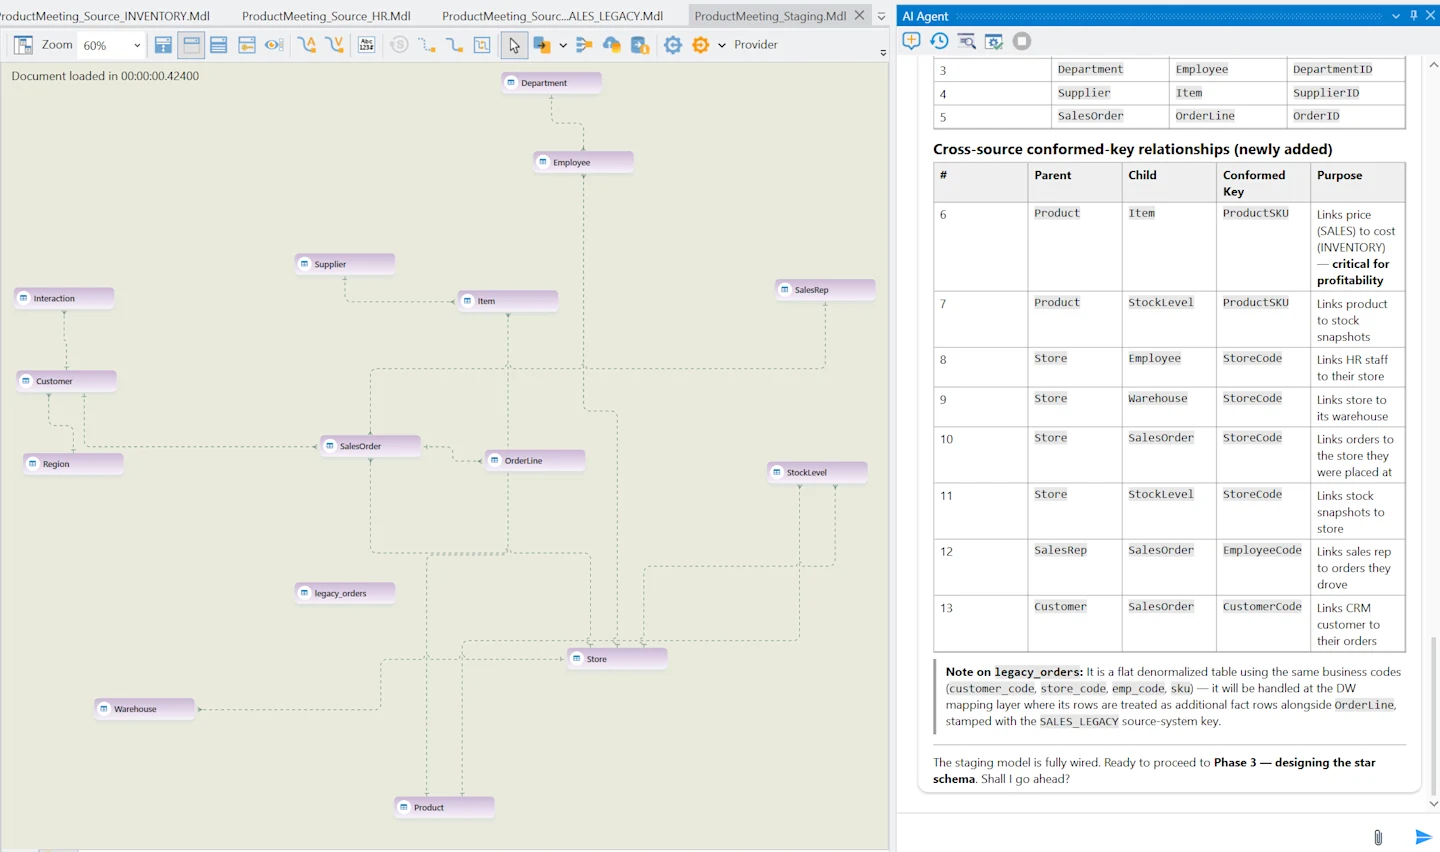
Because these systems were built independently, the same real-world entity, whether a customer, a product, or a store, can appear in several of them under a shared business code (CustomerCode, ProductSKU, StoreCode, EmployeeCode), and the two sales systems even reuse the same order numbers for different orders. Reconciling those conformed keys, keeping track of which source system, each record came from, and handling records that don't line up across systems are exactly the problems the AI Agent works through during the build.
In the past, Deskhive's IT team would have warned management about the substantial capital, time, and specialist resources needed to design and maintain such a warehouse. With the Astera AI Agent, the same outcome is reached by describing the requirement and confirming the agent's proposals as it goes.
Getting Started
Before diving into each phase, here's the high-level flow of the Deskhive build — what you do, and what the agent and Astera Studio do for you, from your first prompt through to the finished dashboard.
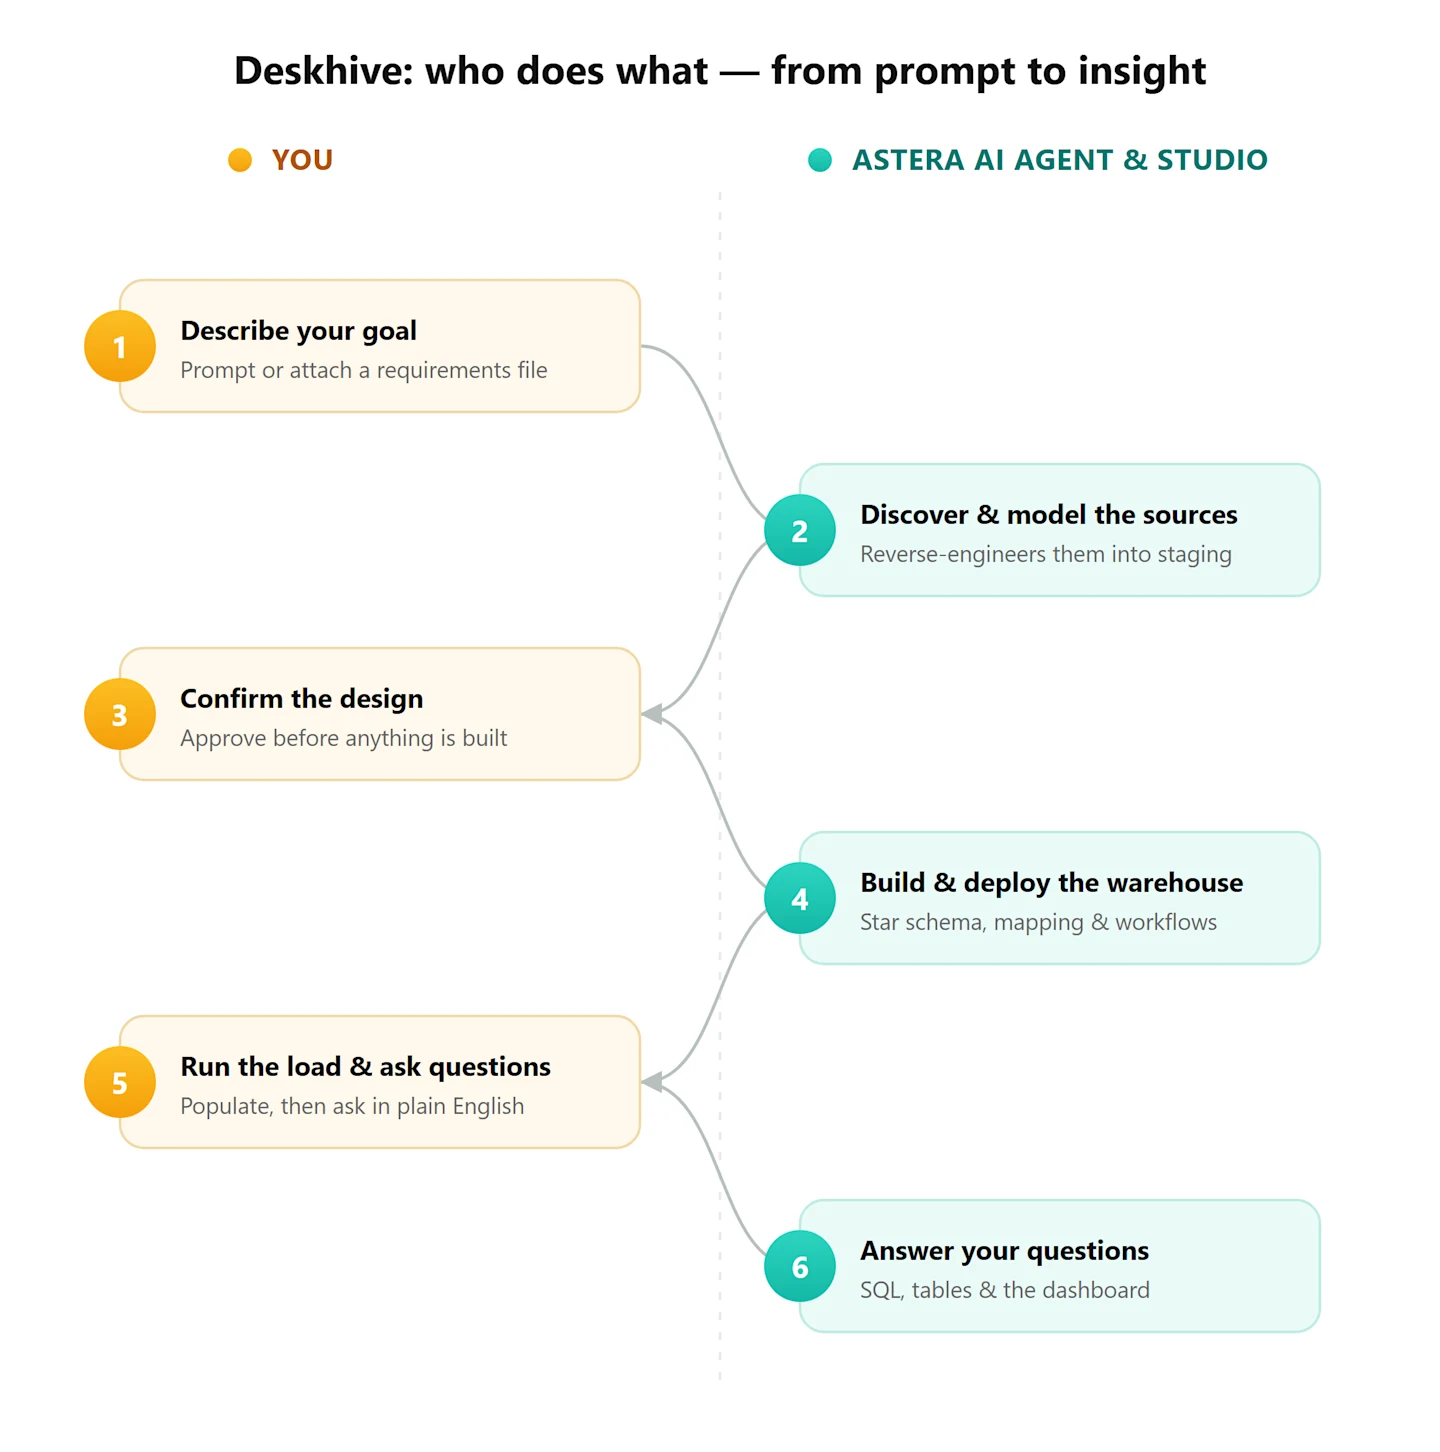
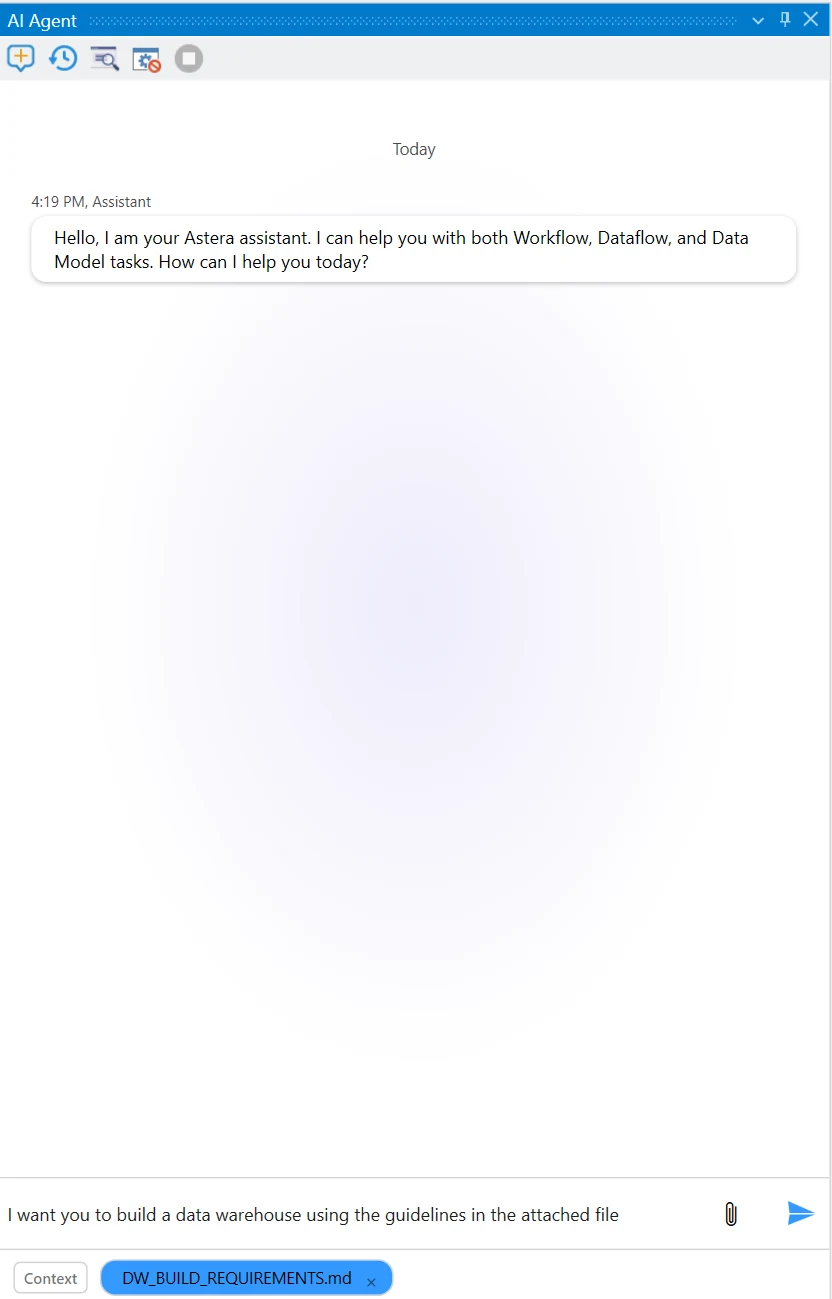
The first step is to open the AI Agent panel in the Astera IDE and tell it what you want to build. You can do this in either of the two ways:
Type a prompt, for example, "Build a data warehouse from my retail source databases that shows profit per product."
Attach a requirements document. Click the attach icon, add a requirements file such as DW_BUILD_REQUIREMENTS.md, and prompt "Build a data warehouse using the guidelines in the attached file."
The requirements document states only the goal and what the source systems are; it does not necessarily dictate the dimensions, keys, or relationships. The agent inspects the actual sources and designs the model itself, raising any gaps with you before adding anything to the design.
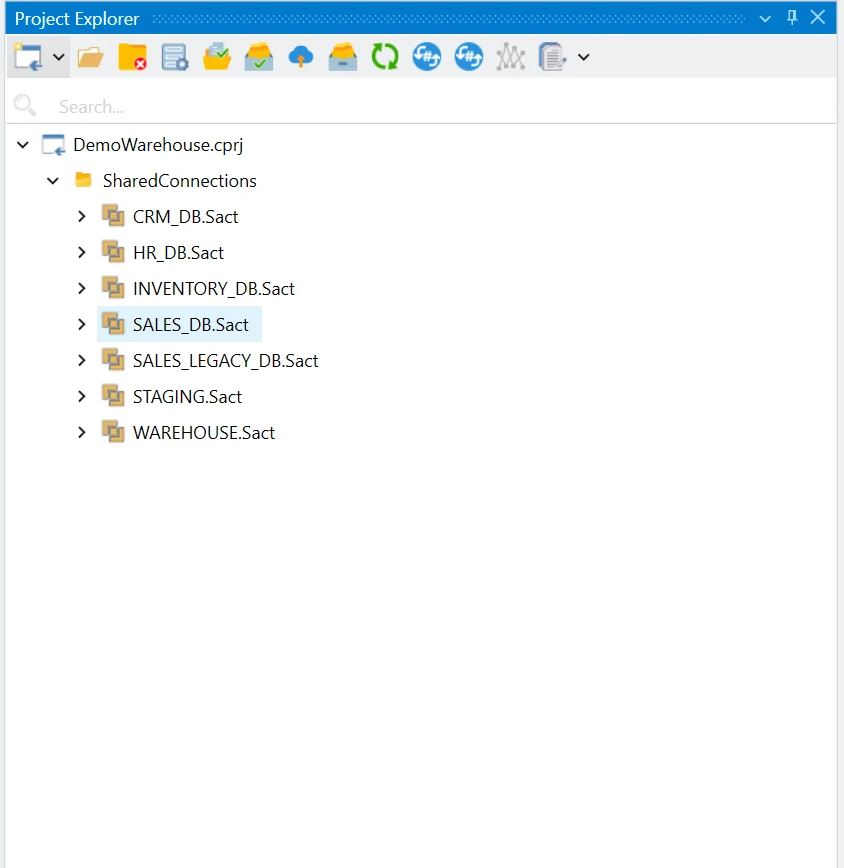
This project uses seven SQL Server connections, stored under SharedConnections/:
Connection | Role |
CRM_DB, SALES_DB, INVENTORY_DB, HR_DB, SALES_LEGACY_DB | One per source database |
STAGING | The staging layer |
WAREHOUSE | The warehouse (target) |
The agent lists the available connections automatically and matches them by name. If a needed connection is missing, it will ask you to create it before continuing.
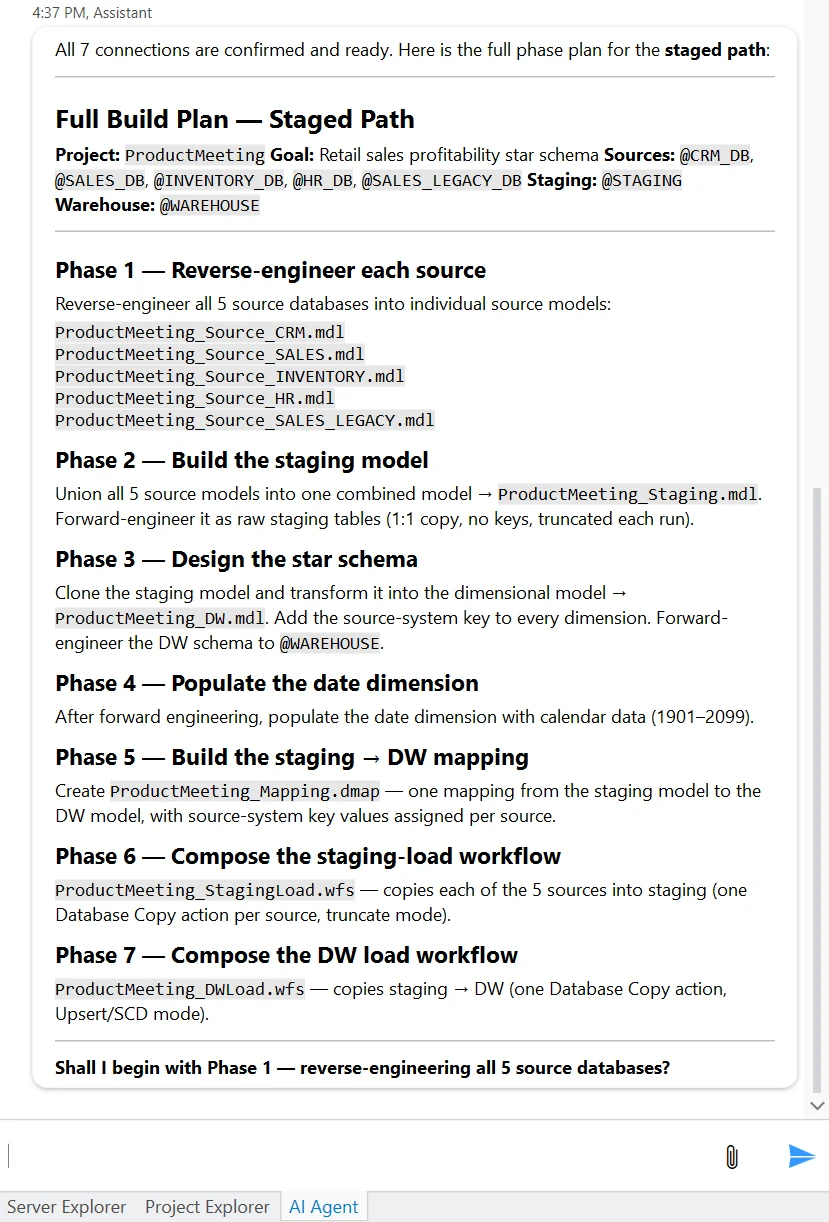
How the Agent Works
Rather than building everything in a single, opaque step, the agent follows a structured data-warehouse playbook and advances through it one phase at a time. At each key decision it pauses and confirms the proposal with you, so you always see what it is about to do and can adjust the design before any tables are created. Once you approve the plan, it presents the full set of phases it will work through and begins.
Deciding on a Staging Layer
The first thing the agent asks is whether you want a staging layer, an intermediate area where raw source data is copied first, before it is transformed into the star schema:
"Do you want a staging layer, an intermediate area where raw source data is copied first? It helps when you have multiple sources, want to re-run loads without re-hitting the source, or need to keep raw copies. Stage, or load directly into the warehouse?"
Because Deskhive draws from five source systems, staging is the natural choice: it lands all of them in one place before the load. For this use-case we'll choose to stage. Since the answer shapes the rest of the plan, the agent waits for your response before continuing.
Discovering and Modeling the Sources
With the staging decision made, the agent connects to each source database and reverse-engineers its schema into its own source data model:
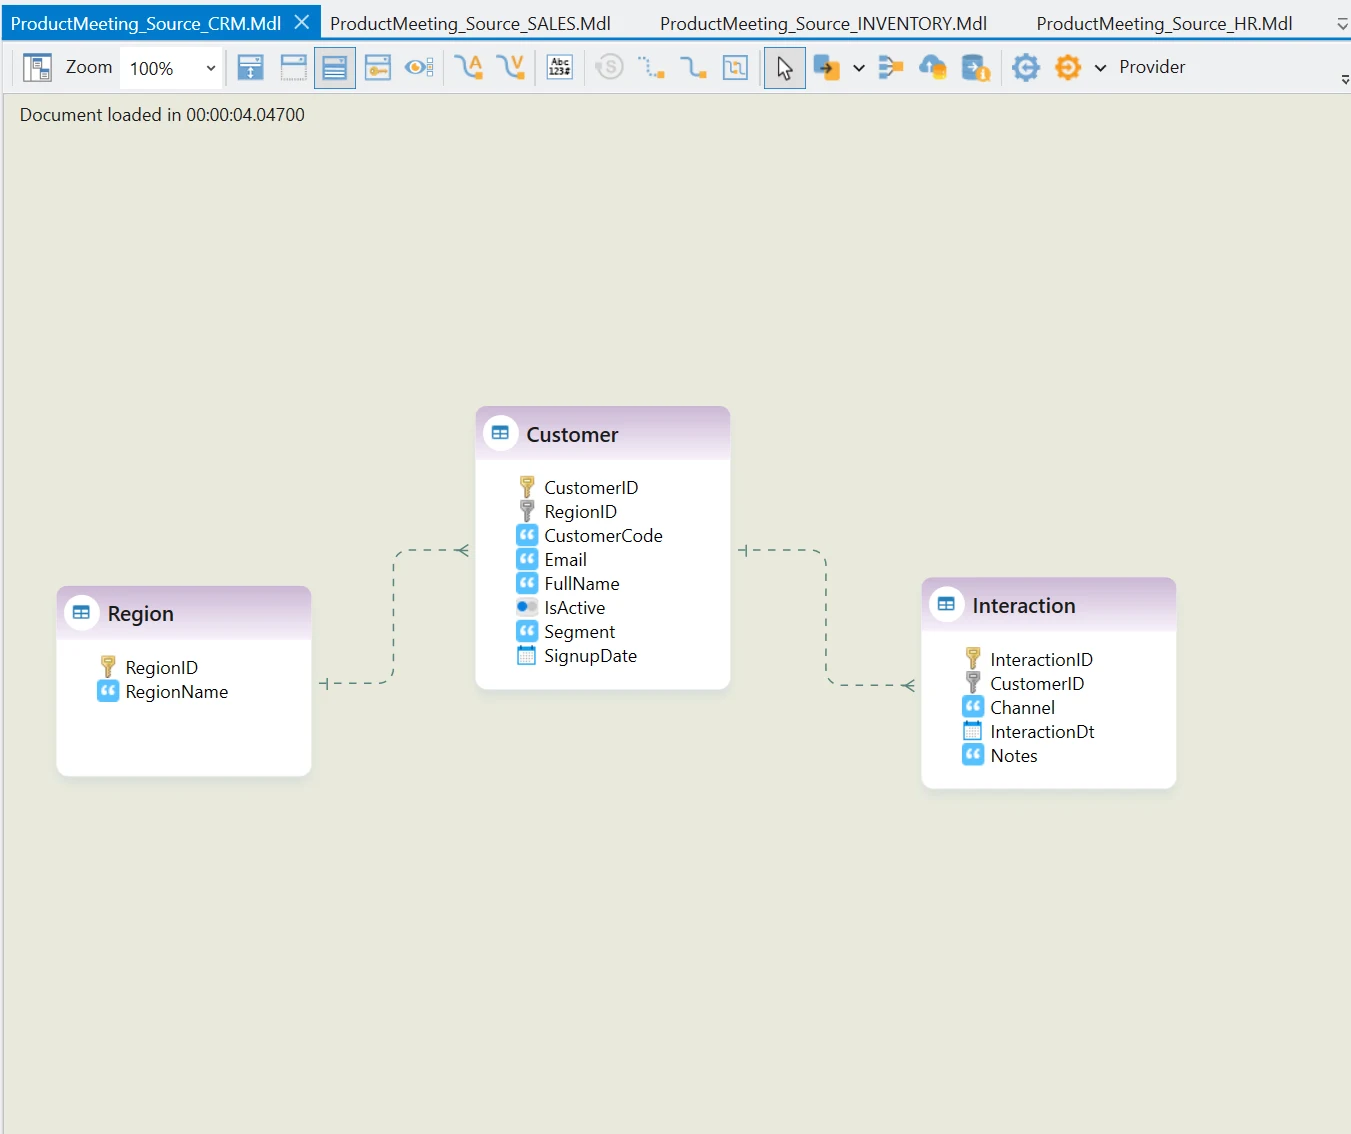
It then unions these into a single combined staging model, identify relationships across systems, and forward-engineers it.
Designing and Deploying the Star Schema
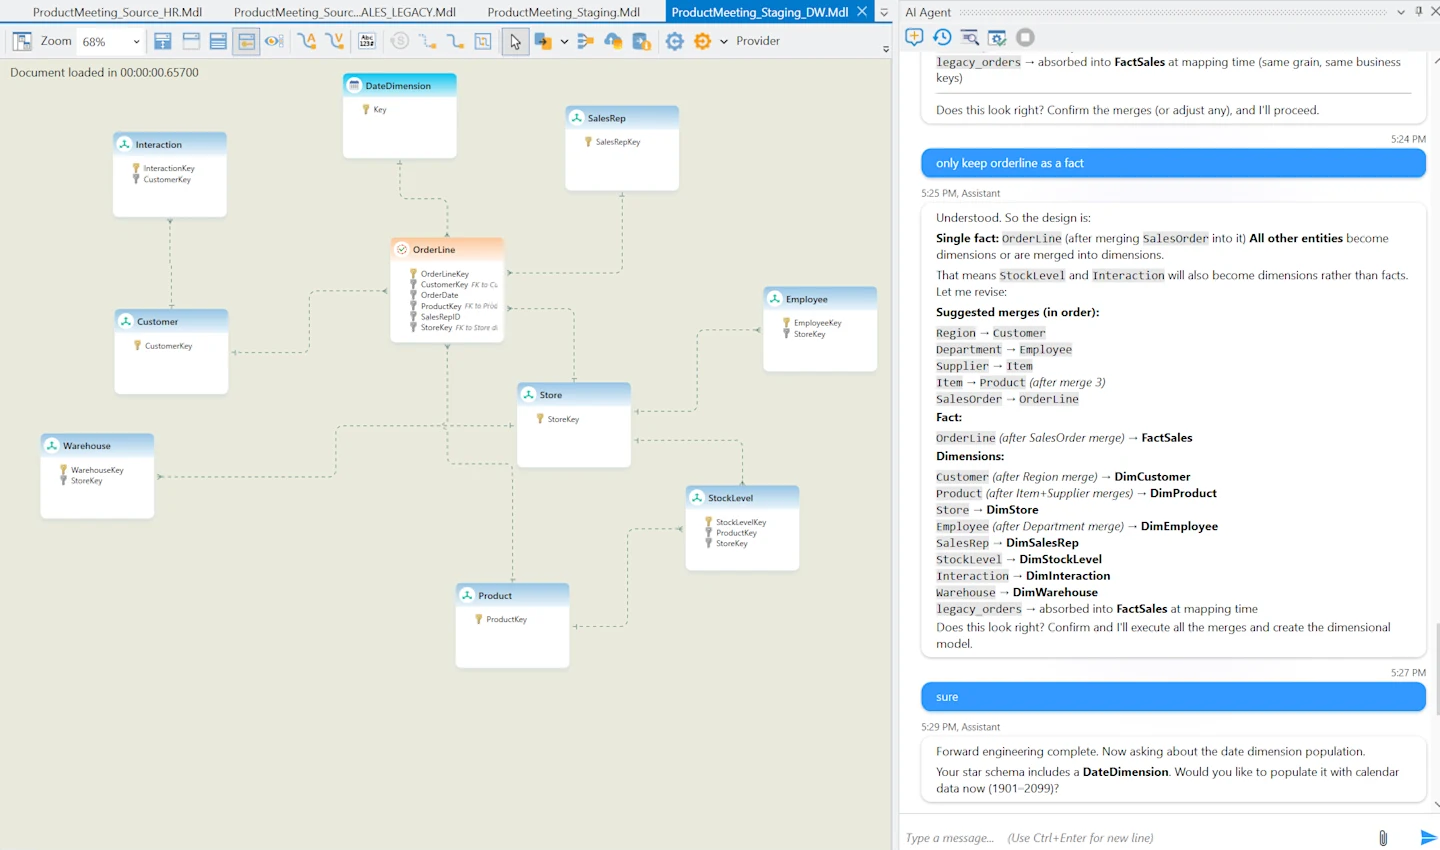
The next step is the heart of the build: designing the dimensional (star schema) model that will serve as the destination schema for Deskhive's warehouse. The agent derives this model from the actual source schema. For Deskhive, it produces a central OrderLine sales fact at the order-line grain, carrying the measures that answer the profitability question (quantity, price, and cost), surrounded by the Product, Item, Supplier, Customer, Region, Employee, Store, and Department dimensions, each built from the conformed business codes shared across the sources. A built-in Date_Dimension is added automatically.
As it designs, the agent confirms the fact grain and the chosen dimensions with you and adds a source-system key so that the same logical record from different systems, for example order SO-1001 from both the modern and the legacy sales systems, stays distinct. When you are satisfied with the design, it forward-engineers the model, deploying the tables, primary keys, and foreign keys to the warehouse database.
Finally, it offers to populate the date dimension with calendar data.
At each of these points, such as "Are you satisfied with the star schema design? Any entities or relationships to adjust before we deploy?", the agent stops and waits for your confirmation.
Building the Mapping
With the schema in place, the agent designs the ETL mapping that loads source data into each table of the warehouse. Because the data has been consolidated in staging, this is a single staging-to-warehouse mapping, Warehouse_Mapping.Dmap. The mapping handles the warehouse-specific logic for you: it performs the dimension lookups that translate source keys into dimension surrogate keys, assigns surrogate keys to the fact rows, applies slowly-changing-dimension (SCD) handling, and stamps each row with its source-system value.
Figure 7: Mapping Document
Composing the Load Workflows
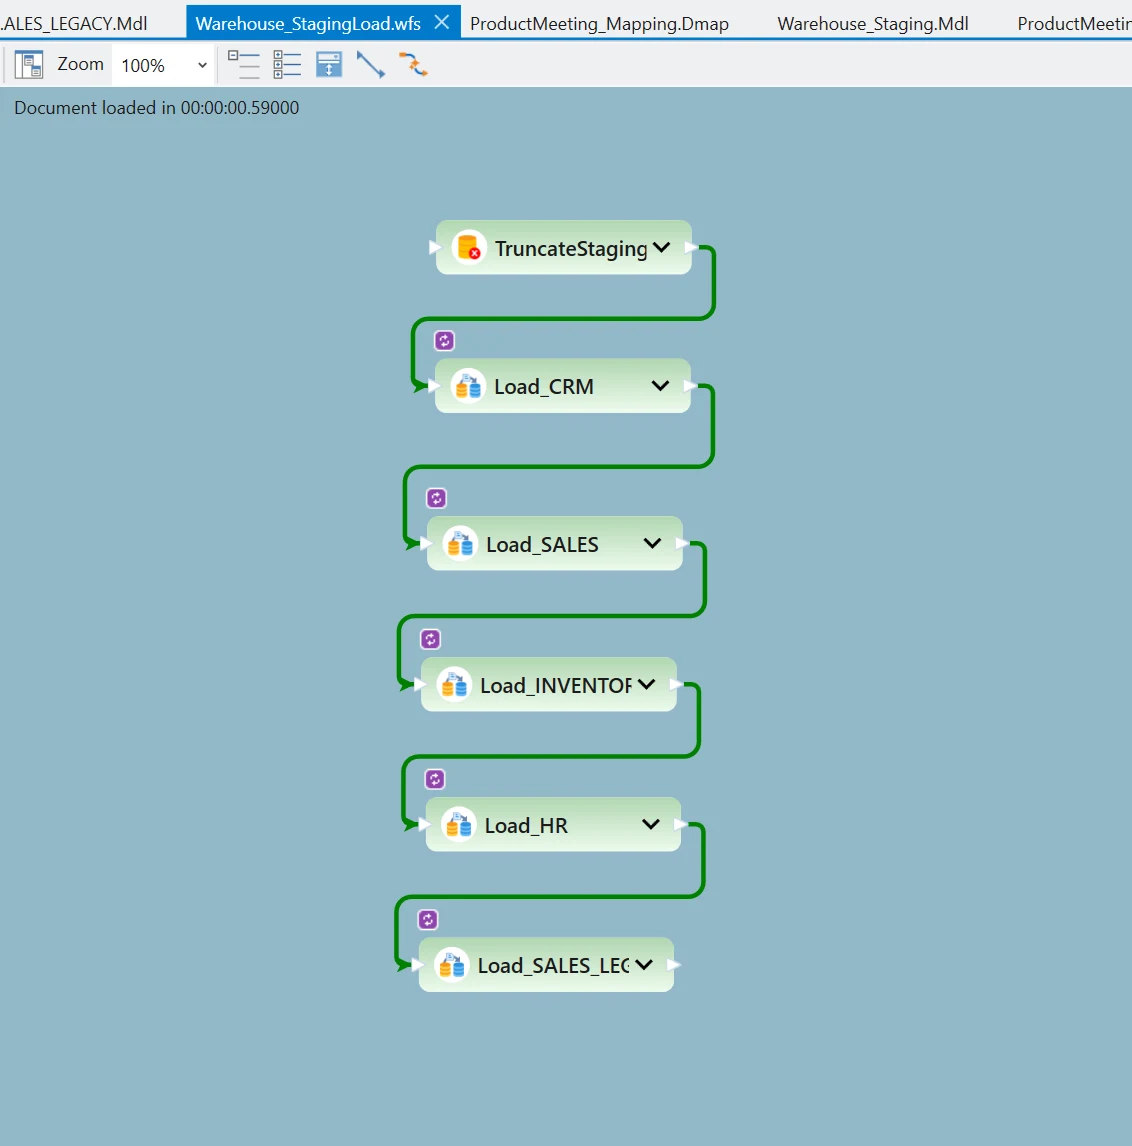
The last step is to orchestrate the load. Because this is a staged build, the agent composes two workflows that run in sequence:
Figure 9 shows the staging workflow that moves raw data from the five sources into the staging tables.
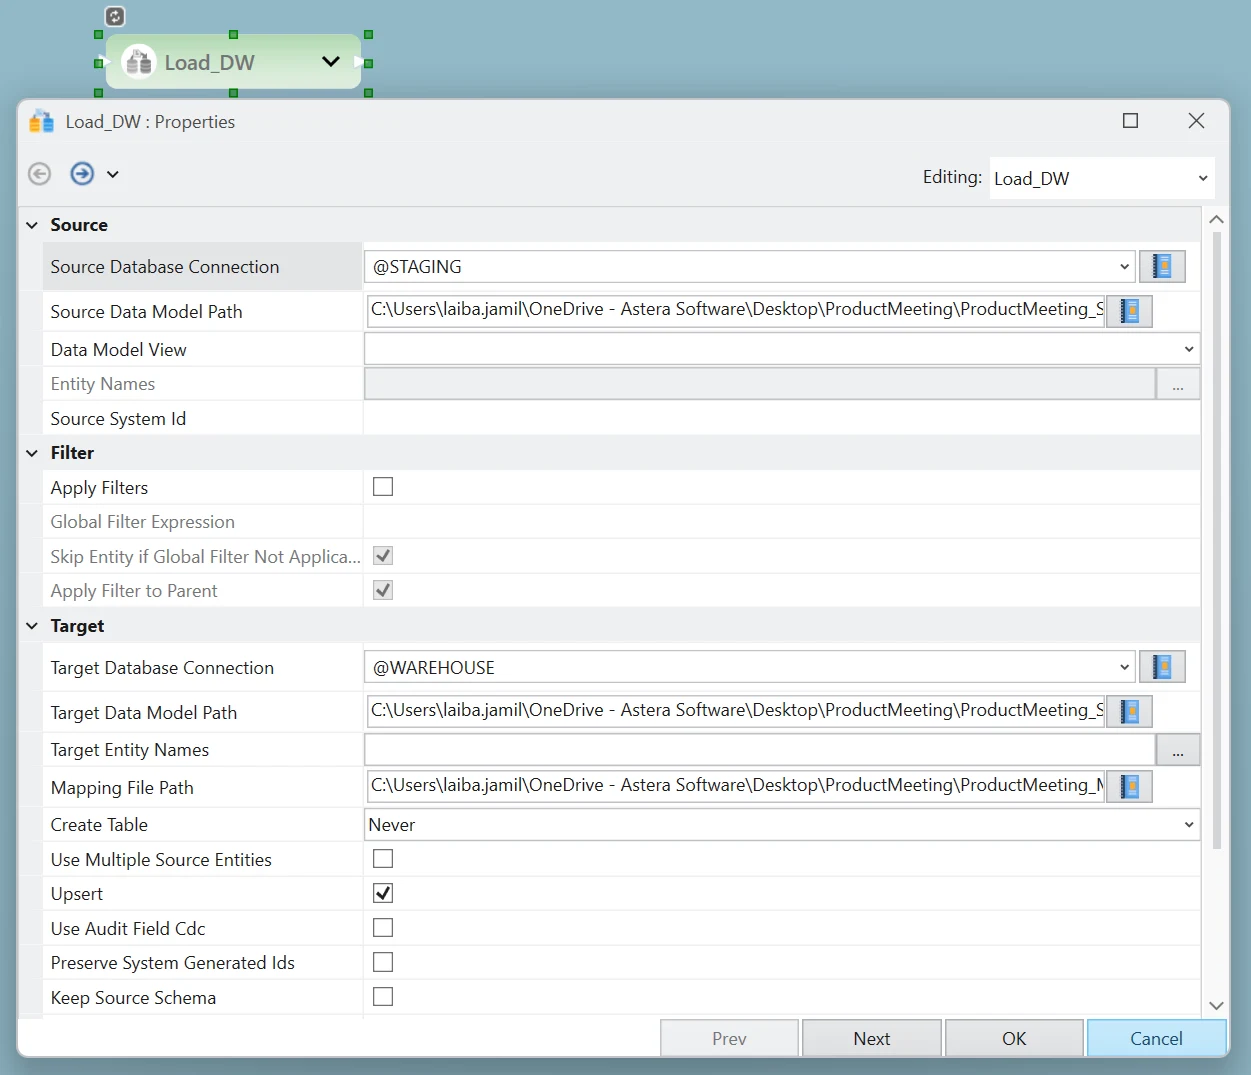
Figure 10 shows the warehouse-load workflow that moves data from staging into the star schema, using a Database Copy action, which automatically loads the dimensions before the facts, followed by a referential-integrity check.
The agent presents each action list, waits for your approval, and then creates, verifies, and saves the workflows.
Running the Load
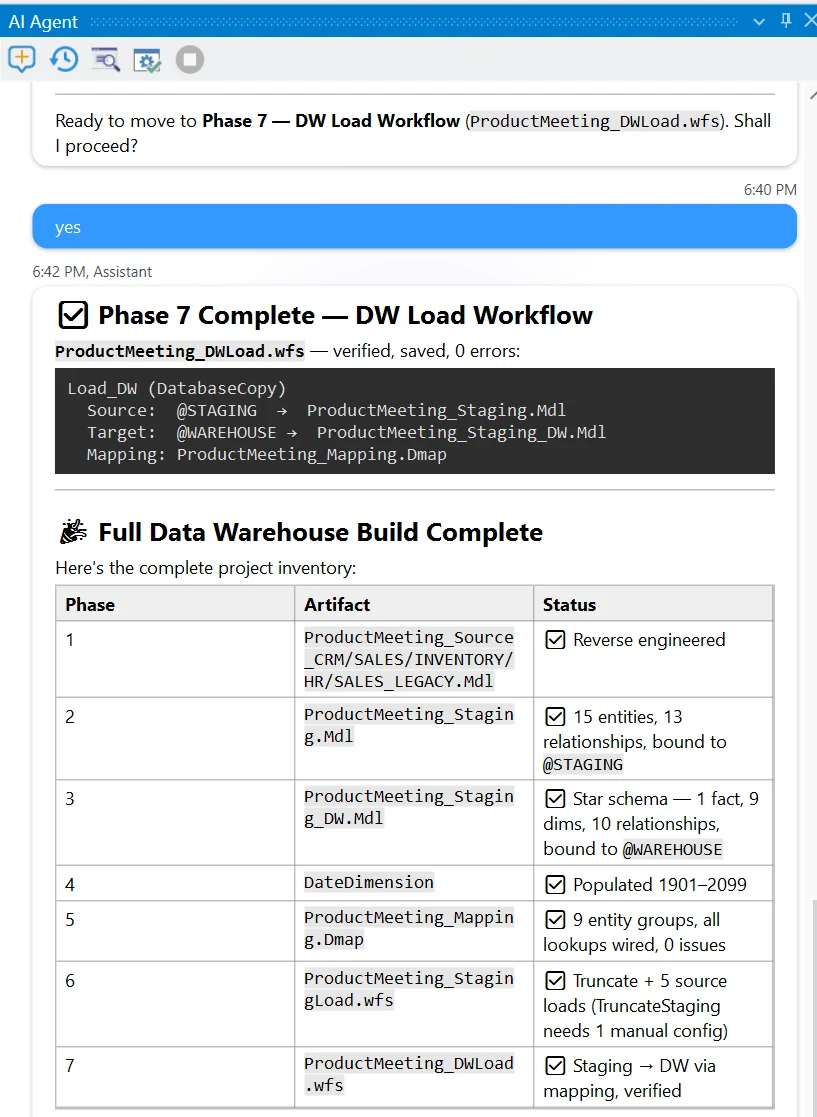
To populate the warehouse for the first time, you run the staging-load workflow followed by the warehouse-load workflow. On every subsequent run, the same workflows handle new and changed rows automatically through their Upsert/SCD logic, so they can be scheduled to run nightly with the Astera Scheduler without any changes.
At this point the build is complete. The Warehouse project now contains everything the agent produced: the five source models, the staging model, the deployed dimensional model, the mapping, and both load workflows. The warehouse is populated and ready to query.
Analyzing the Warehouse in Astera Studio
With the warehouse built and loaded, Deskhive's data warehouse can now be explored conversationally in Astera Studio, with no SQL required.
To begin, you start a new chat in Astera Studio and attach your warehouse: the warehouse connection (WAREHOUSE.Sact) and the dimensional model (Warehouse_DW.Mdl). Studio reads the schema and is then ready to query it directly.
Once connected, you describe the analysis you want in plain English, for example:
"This is my warehouse. Create a dashboard that measures profitability for each product that we sell."
Studio works through the request step by step, querying the warehouse to validate the metrics and then building the charts. It saves a Product Profitability dashboard (Product Profitability.Dsh) that joins OrderLine (revenue), Product (price and category), and Item (unit cost).
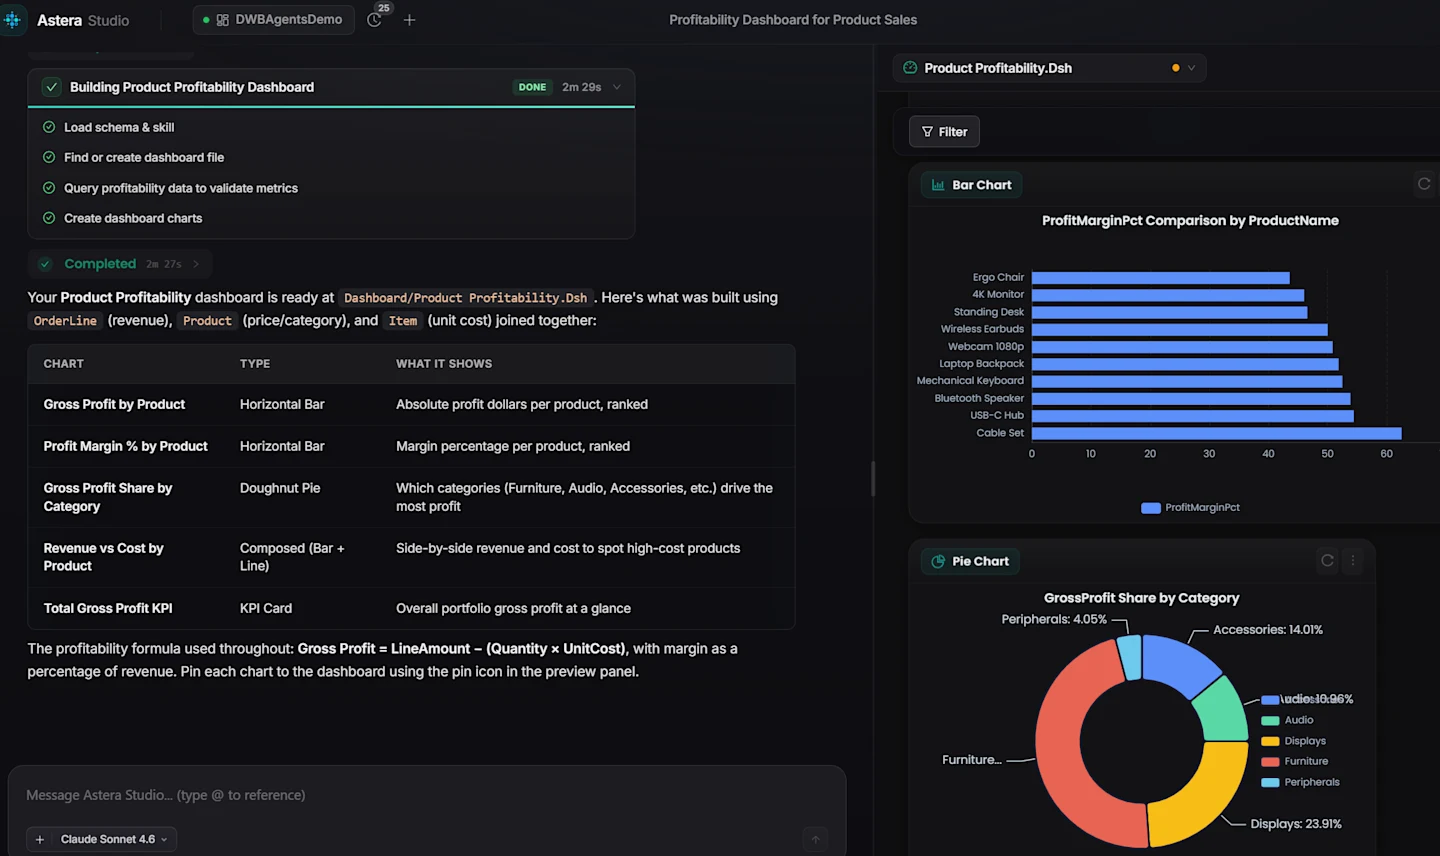
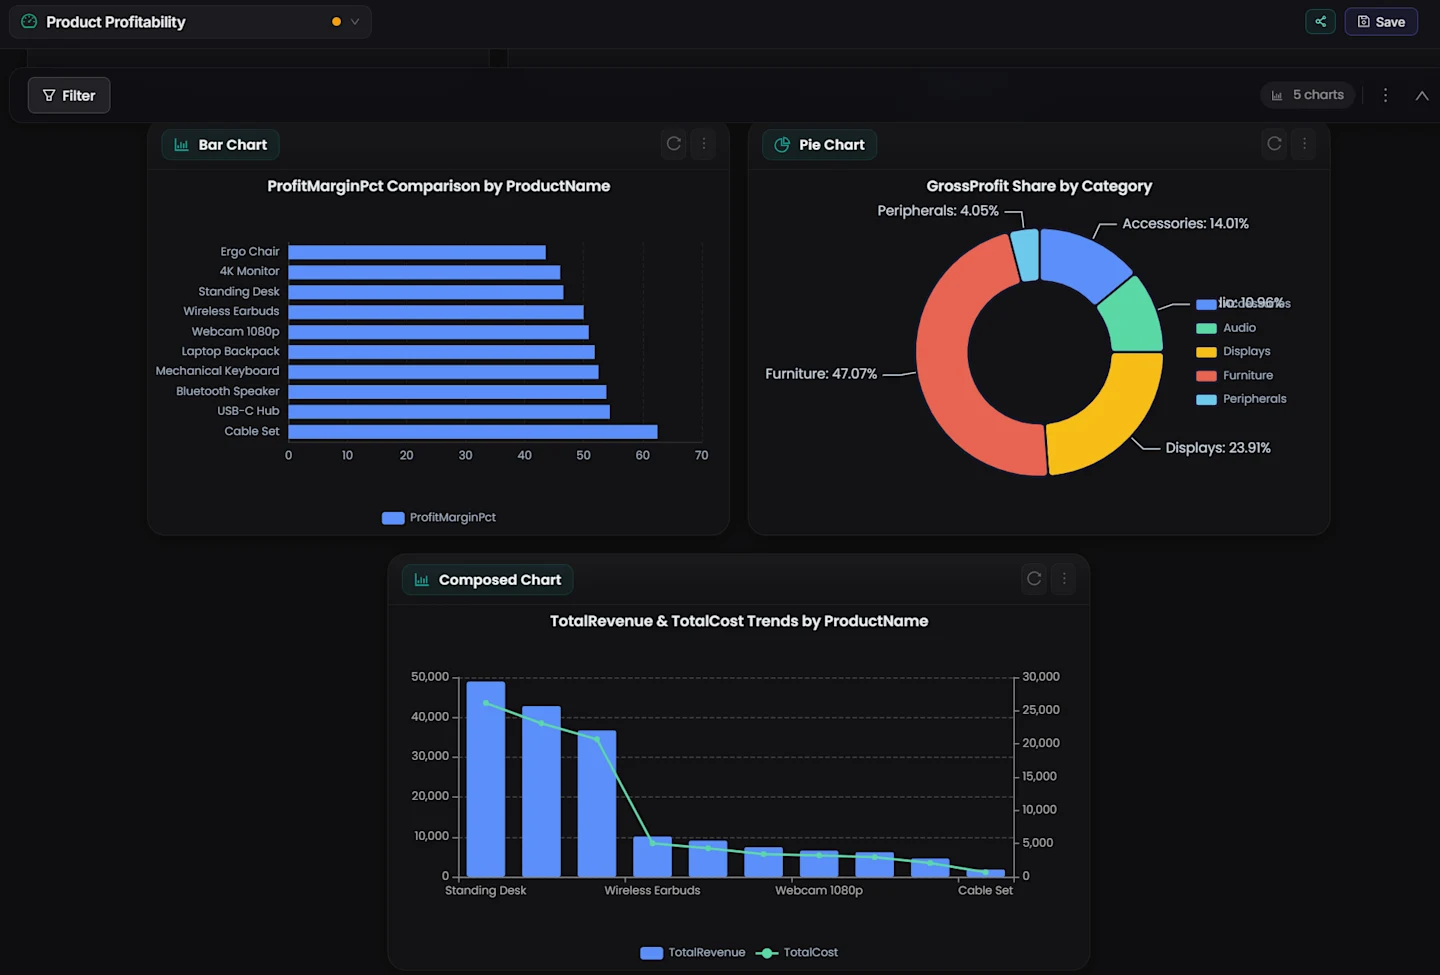
The finished dashboard ranks gross profit and profit margin by product, shows each category's share of profit, and compares revenue against cost. It turns the warehouse the agent built into a self-service analytics surface for the whole team.
Conclusion
In this use case, we saw how the Astera AI Agent took Deskhive from a single business requirement to a fully deployed, loaded data warehouse. It discovered and staged five source systems, designed and deployed a star schema, built the load mapping, and composed the load workflows. Throughout the build, it confirmed each decision with us along the way. We then connected to that warehouse in Astera Studio and answered real business questions in plain English, complete with the generating SQL and the resulting charts. Together, the two tools take you from prompt to insight without hand-writing a model, a mapping, or a line of SQL.