The Automated, No-Code Data Stack
Learn how Astera Data Stack can simplify and streamline your enterprise’s data management.

Connect to Azure SQL Database
Within the data management space, SQL Server needs no introduction. It’s Microsoft’s breed of scalable relational databases intended primarily for storing and retrieving data. While SQL Server is easily one of the best RDBMS, it’s not cloud-native. Therefore, Microsoft decided to embrace the cloud technology and in 2010, launched Azure SQL Database for enterprises dealing with high volume data.
But what is Azure SQL Database and how is it different from SQL Server? More importantly, how can you connect to Azure SQL Database and power your business decisions?
Let’s find out.
What is Azure SQL Database?
Azure SQL Database is a cloud-based RDBMS available along with Microsoft’s other products and services under Azure. It’s a purpose-built, fully managed database service for improved scalability and high availability. The database’s speed, ease of use, and low downtime make it a popular option among data-driven enterprises that mine large volumes of data for decision-making.
Azure SQL Database vs SQL Server: is there a difference?
With Microsoft releasing countless applications and services not only with similar names, but also functionalities, it’s only natural to get confused. So, let’s just clear the confusion between SQL Server and Azure SQL Database once and for all.
Keep in mind though, Microsoft calls Azure SQL Database a platform as a service (PaaS) that runs on the latest stable version of SQL Server. Additionally, they both are relational databases; however, they differ in the following ways:
|
SQL Server |
Azure SQL Database |
| SQL Server is deployed on-premises and is not multitenant like Azure SQL Database | Deployed in the cloud, Azure SQL Database is purpose-built to be multitenant. It can host multiple databases from multiple clients |
| Applications can talk directly to the SQL Server over the Local Area Network (LAN) via TDS protocol over TCP/IP or via HTTP | Applications have to explicitly make a call and reach to the Azure Gateway from behind a firewall. Can only use TCP/IP for communication |
| Optional to have a clustered index | All tables must have a clustered index |
| Better fit for applications that require specific agents at the OS level for security | Better fit for applications that use Azure Security Features |
| Support for a wide variety of data types | Supports most data types supported by SQL Server except for a few |
How can you connect to Azure SQL Database?
There are multiple ways you can establish connectivity to Azure SQL Database. However, the method you decide to go with will be guided by your business requirements, for example,
- the number and type of data sources you get data from
- whether or not you need to transform your data
- whether or not you need to improve data quality
SQL Server Migration Assistant (SSMA)
Let’s say you have MS Access as your only data source and you want to migrate your data to Azure SQL, you can use Microsoft’s SQL Server Migration Assistant. Why this works is because you’re already inside Microsoft’s ecosystem and it makes total sense to use a native application.
To connect to Azure SQL Database using SSMA, follow these steps:
- Create a project in SSMA
- Go to File and select Connect to SQL Azure
- Once the connection dialog box pops up, select the server of Azure SQL Database
- Select or enter the database name
- Provide username and password
- Click connect
Keep in mind though SSMA might not be the best choice if you require automation capabilities. It does not support automatic synchronization of Azure SQL Database metadata. You’ll have to do that manually using another application, Azure SQL Database Metadata Explorer.
Moreover, SSMA only supports a few data sources including MS Access, DB2, MySQL, Oracle, and SAP SE. So, if your data source is outside of this list, you’ll have to resort to a third-party data integration platform.
SQL Server Management Studio (SSMS)
If you’re still convinced that you want to stay in Microsoft’s ecosystem, you can also use Microsoft SQL Server Management Studio (SSMS) to connect to Azure SQL Database. Here’s how you can connect to Azure SQL Database using SSMS:
- Open SSMS
- On the Connect to Server dialog box, enter Server type, Server name, Authentication, User ID, and Password
- Select Options and select your database from the Connect to Database drop down
- Select Connect
While SSMS enables you to connect to Azure SQL Database, you’ll still need another application to extract, transform, and load data to the database. Another thing to keep in mind is that you’ll have to update SSMS manually every time Microsoft releases an update.
While it makes sense to stay within an ecosystem and use native applications to integrate data, things start to disintegrate as business requirements change, and stepping outside of the ecosystem becomes imminent, as we’ve seen above.
This brings us to the question, what is the best way to connect to Azure SQL Database?
Connecting to Azure SQL Database with a modern data stack
By using a modern data integration platform, like Astera Centerprise, you can connect to databases in Azure SQL, combine data from cloud platforms, databases, and data warehouses, and build a single source of truth.
Astera’s native connector allows you to seamlessly connect to Azure SQL database without writing a single line of code. It allows you to:
- Read from and write data to Azure SQL
- Define the schema for your database tables
- Use functions and custom expressions to clean, validate, and standardize your data
Astera’s Azure SQL connector offers you the freedom to Delete, Insert, Update, and Upsert data in your Azure SQL tables while maintaining data integrity and reducing errors and inconsistencies – all in a single, unified, and fully managed platform.
To connect to Azure SQL database, simply:
1. Drag and drop the Database Table Source object on to the dataflow designer and select Azure SQL from the Data Provider drop-down
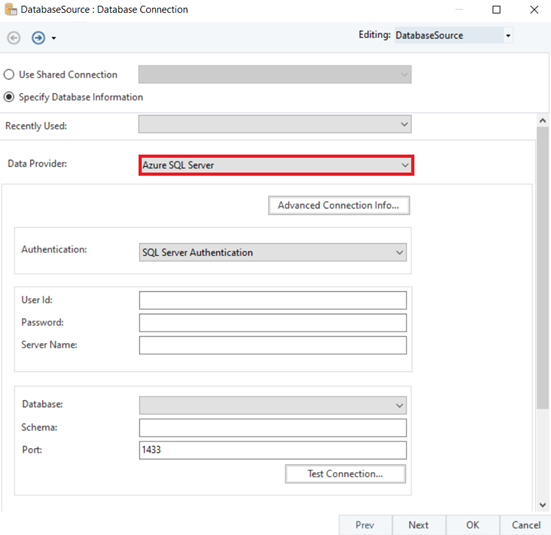
Configuring Azure SQL Database source connector
2. Next, select your preferred authentication method from the Authentication drop-down to access your Azure SQL database.
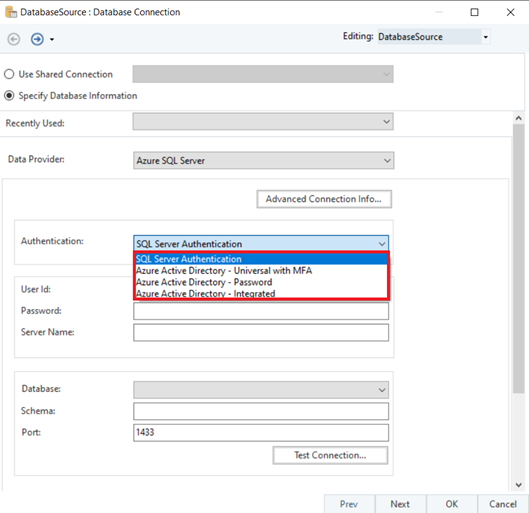
Different Azure SQL Database authentication methods supported by Astera Centerprise
Speaking of authentication, you have the flexibility of choosing from four different authentication methods:
- Azure Active Directory – Universal with MFA (Multi-Factor Authentication)
- Azure Active Directory – Password
- Azure Active Directory – Integrated
- SQL Server Authentication
3. Once you select your preferred authentication method, you can then select the database you want to extract data from.
4. Next, select the table from the Pick Table drop down.
Here you can decide whether you want to read data using Full Load, to read the entire table, or Incremental Load which is based on audit fields. On the next screen, you get the Layout Builder where you’ll be able to view data types, formats, description, and other options.
Extracting data from Azure SQL Database
Once connected to your Azure SQL Database, you’ll be able to build ETL pipelines using dataflows and workflows.
The screenshot below illustrates an example of how you can use Astera Centerprise’s native connector to connect to an Azure SQL database, extract data, and load it into the destination of your choice.
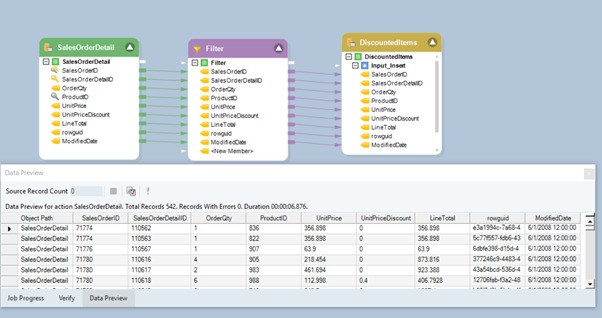
Connecting to Azure SQL Database and building an ETL pipeline
Here, we connect to an Azure SQL database table called Sales Order Detail, filter out the data using the Filter transformation, and load this transformed data into a SQL Server table called Discounted Items.
Transforming and loading data into Azure SQL Database
Just as you can use the connector to extract data, you can also use it to load data. Let’s say you want to load sales data from an Excel file to your Azure SQL Database. You also want to transform this data such that the cash and credit/debit card payments end up in separate tables in the database.
This is how the pipeline looks like:
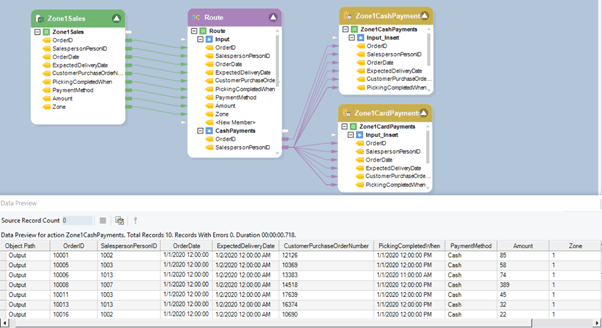
Using Microsoft Azure SQL Database as a destination
To do this, use the Route transformation and input the expression, as shown in the image below, to segregate Cash Payments records from Card Payments records. The Route transformation has two outputs for each of these rules and a Default output in case you need to process unchanged records.
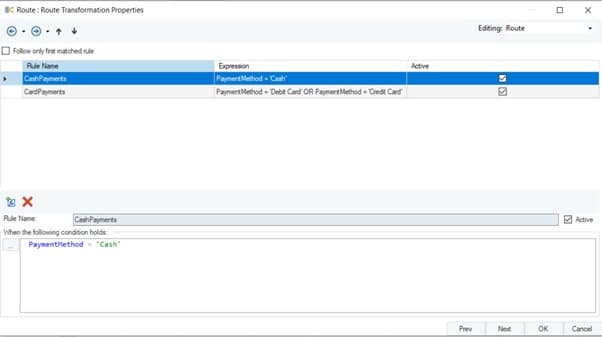
Properties of the Route transformation
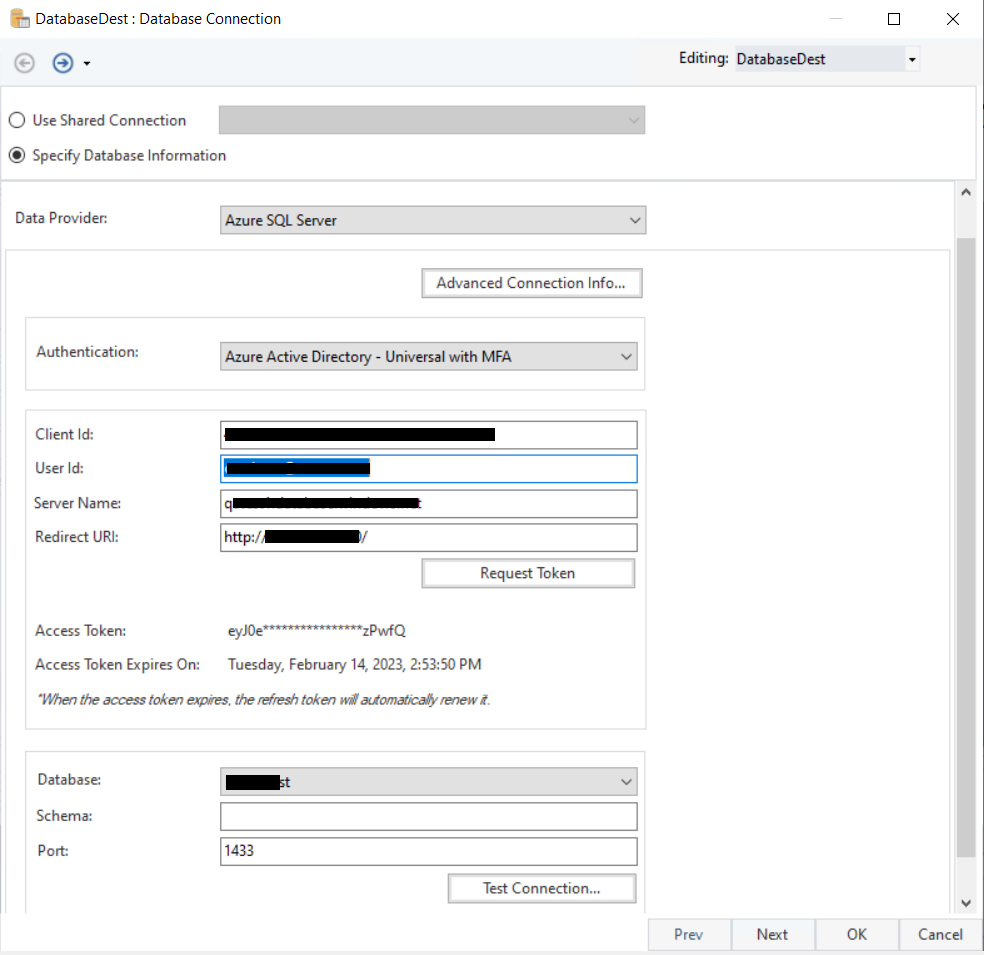
Both Database Table Destinations, i.e., Zone1CashPayments and Zone1CardPayments, are configured to connect to Azure SQL Database.
Using Astera Centerprise’s native connector to load data into Azure SQL Database
Unlock faster time to insights with Astera Centerprise
With Astera’s parallel-processing ETL/ELT engine, Centerprise enables you to:
- handle high volume data from multiple, disparate sources,
- build fully automated ETL pipelines without coding,
- load healthy data to the destination of your choice, whether on-premises or in the cloud.
The outcome? You gain actionable insights and make reliable, more informed decisions at lightning speed.
Now that you’ve discovered the fastest way to connect to Azure SQL Database, why don’t you register for a 14-day free trial and give Astera Centerprise a go?
Authors:
Afnan Rehan


 Nov 11th